Hello fellow woodworkers! I have updated my website and now post all of my blog entries at djmarks.com

I often get inquiries from fellow woodworkers about finishing products, particularly about the best way to extend the shelf life of various products:
Hello David,
Speaking of finishes, I was never a fan of poly but I tried the wipe on poly you recommended by General Finish. The sealer is very good and lasts a long time in the can, but the other poly products (gloss and semi) coagulate in the can after just a few weeks. Is this normal? Danish Oil, on the other hand, keeps for many months without setting up. One other thought, can the coagulated poly be reconstituted by thinning with mineral spirits? I tried but am nervous about applying it. Thanks for your help.
Regards,
John
Hello John,
General Finishes makes great products and it’s good to hear that you have been working with them. The coagulation’s or “skinning over” in the cans that you have been experiencing is quite normal. This process occurs due to the fact that Arm-R-Seal is made up of a blend of oil and polyurethane as well as solvents and driers. Polyurethane is an “air oxidizing finish” which means it dries by reacting with the oxygen in the air. As you use some of the finish and air begins to replace the loss of liquid in the can, the oxygen in the air, begins to react with the polyurethane in the can and the result is “that gel” that thickens and hardens on the top of the liquid.
My recommendation is to use a product called “Bloxygen” which is an inert gas containing Argon. Argon is heavier than air and when you lift the lid of the can and spray a 4 second shot in there, it will settle on top of the liquid and force the oxygen up to the top of the can. In my experience this product really works well and is worth the cost.
Here is a good YouTube video on Bloxygen:
I would also advise you to dispose of any any cans of finish that have skinned over. Using skinned over finishes is inviting trouble and they most likely will not dry or fully harden. I take my disposable finishes to the Sonoma County refuse area. Check out the attached photos and have fun at the recycle facility if you need to stop there.

Entrance to Sonoma County (California) Refuse Area

Sonoma County Refuse Facility

Things you see at the Sonoma County Refuse Facility
One last piece of advice: always use the gloss finish for building all of your coats. If you want to dull the finish to a semi-gloss or satin, than apply one or two coats of a semi-gloss or satin finish for the last couple of coats. Another method is to use 0000 steel wool and some renaissance wax to lower the sheen and smooth the last coat of finish.

Egyptian Table
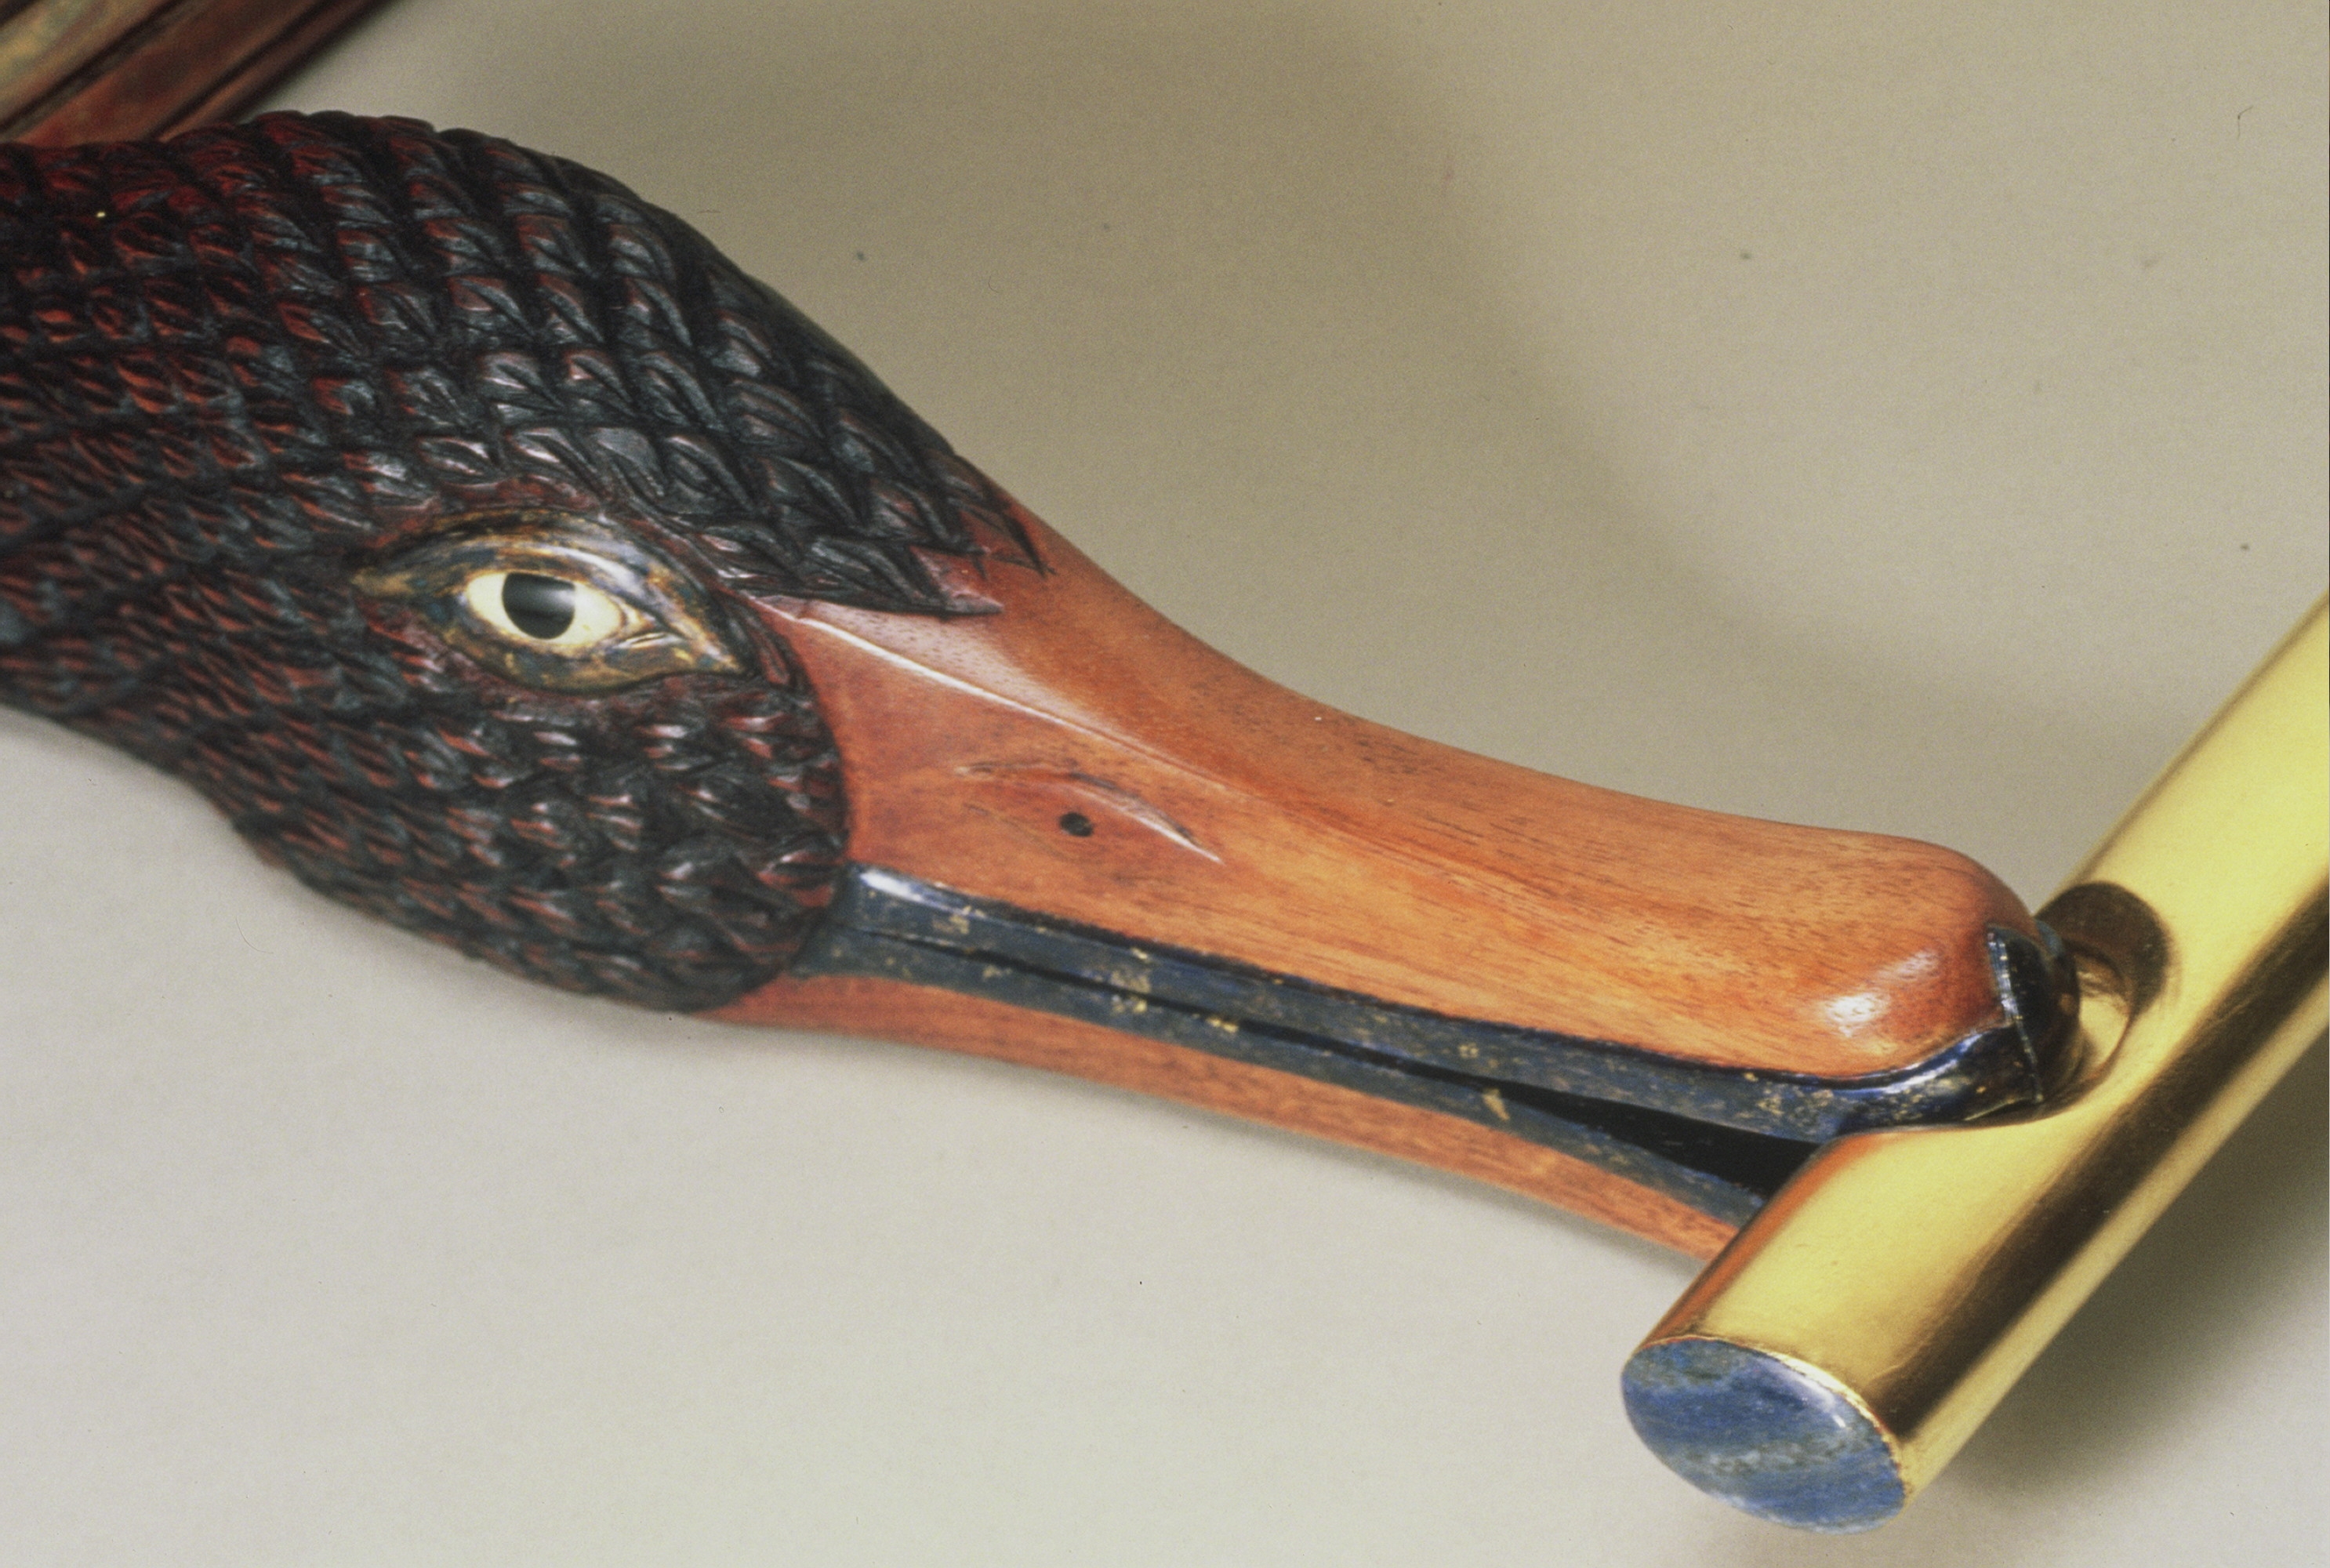
Detail Egyptian Table
The finish is usually the last thing that you do when building a piece of furniture, but it is the first thing that someone sees when looking at your work. You can do a great job designing and building a piece of furniture, but if the finish is of poor quality it will devalue the entire piece. Finishes can be divided into two main categories: air oxidizing finishes and solvent release finishes. Air oxidizing finishes cure by reacting with oxygen and this category includes oils, varnishes, and urethanes. Solvent release finishes cure when the solvents evaporate into the air, leaving a layer of resin on the surface. Finishes in this category include shellac, lacquer, and some water based finishes.
No matter which type of finish you select, keep in mind that approximately 60% to 70% of a good finish is surface preparation. That means scraping and sanding until all saw marks, mill marks, etc, are removed. Tabletops are the most critical and need to be examined in raking light. That means placing a light source near the table and positioning yourself so that you can see the light reflect off the top. As you move around, your eyes should be able to scrutinize every square inch of the top, revealing any scratches, flaws, high spots, or low spots.
Generally speaking, I prefer a hand rubbed oil finish for most of the furniture that I build. Linseed oil and Tung oil are the two most commonly used oils in finishes and both of them have withstood the test of time. Linseed oil is derived from the flax plant and has been used since the ancient Egyptians. Tung oil is derived from the nuts of the Tung tree which grows in the Far East and was used to help preserve the Great Wall of China.
Both of these oils penetrate the structure of wood cells creating a finish that is “in” the wood as opposed to being “on” the wood. Applying multiple thin coats will create depth and accentuate the figure of the wood.
Oil finishes do not offer the same resistance to moisture that film finishes like lacquer and polyurethane do, but the trade off is that they allow for a very natural looking finish and permit you to experience the tactile quality of the wood. In addition, they are easy to repair. If the surface looks worn, you do not have to strip it and sand it; you simply rub in another coat of oil. I have also found that they can be enhanced by lightly rubbing with 0000 steel wool and applying a light coat of wax.
Note:
I will be teaching a 5 days hands on class on Finishing in my Workshop/Studio here in Santa Rosa, California on August 1 – 5, 2013.
Finishes that I will cover in the class include: shellac, various oils, as well as lacquers and polyurethanes. For those that have seen Woodworks, I will cover in depth my technique for applying hand rubbed oil finishes which are also known as wiping varnishes.
Here is the link to the Classes Section of my website that gives the class description and registration information.
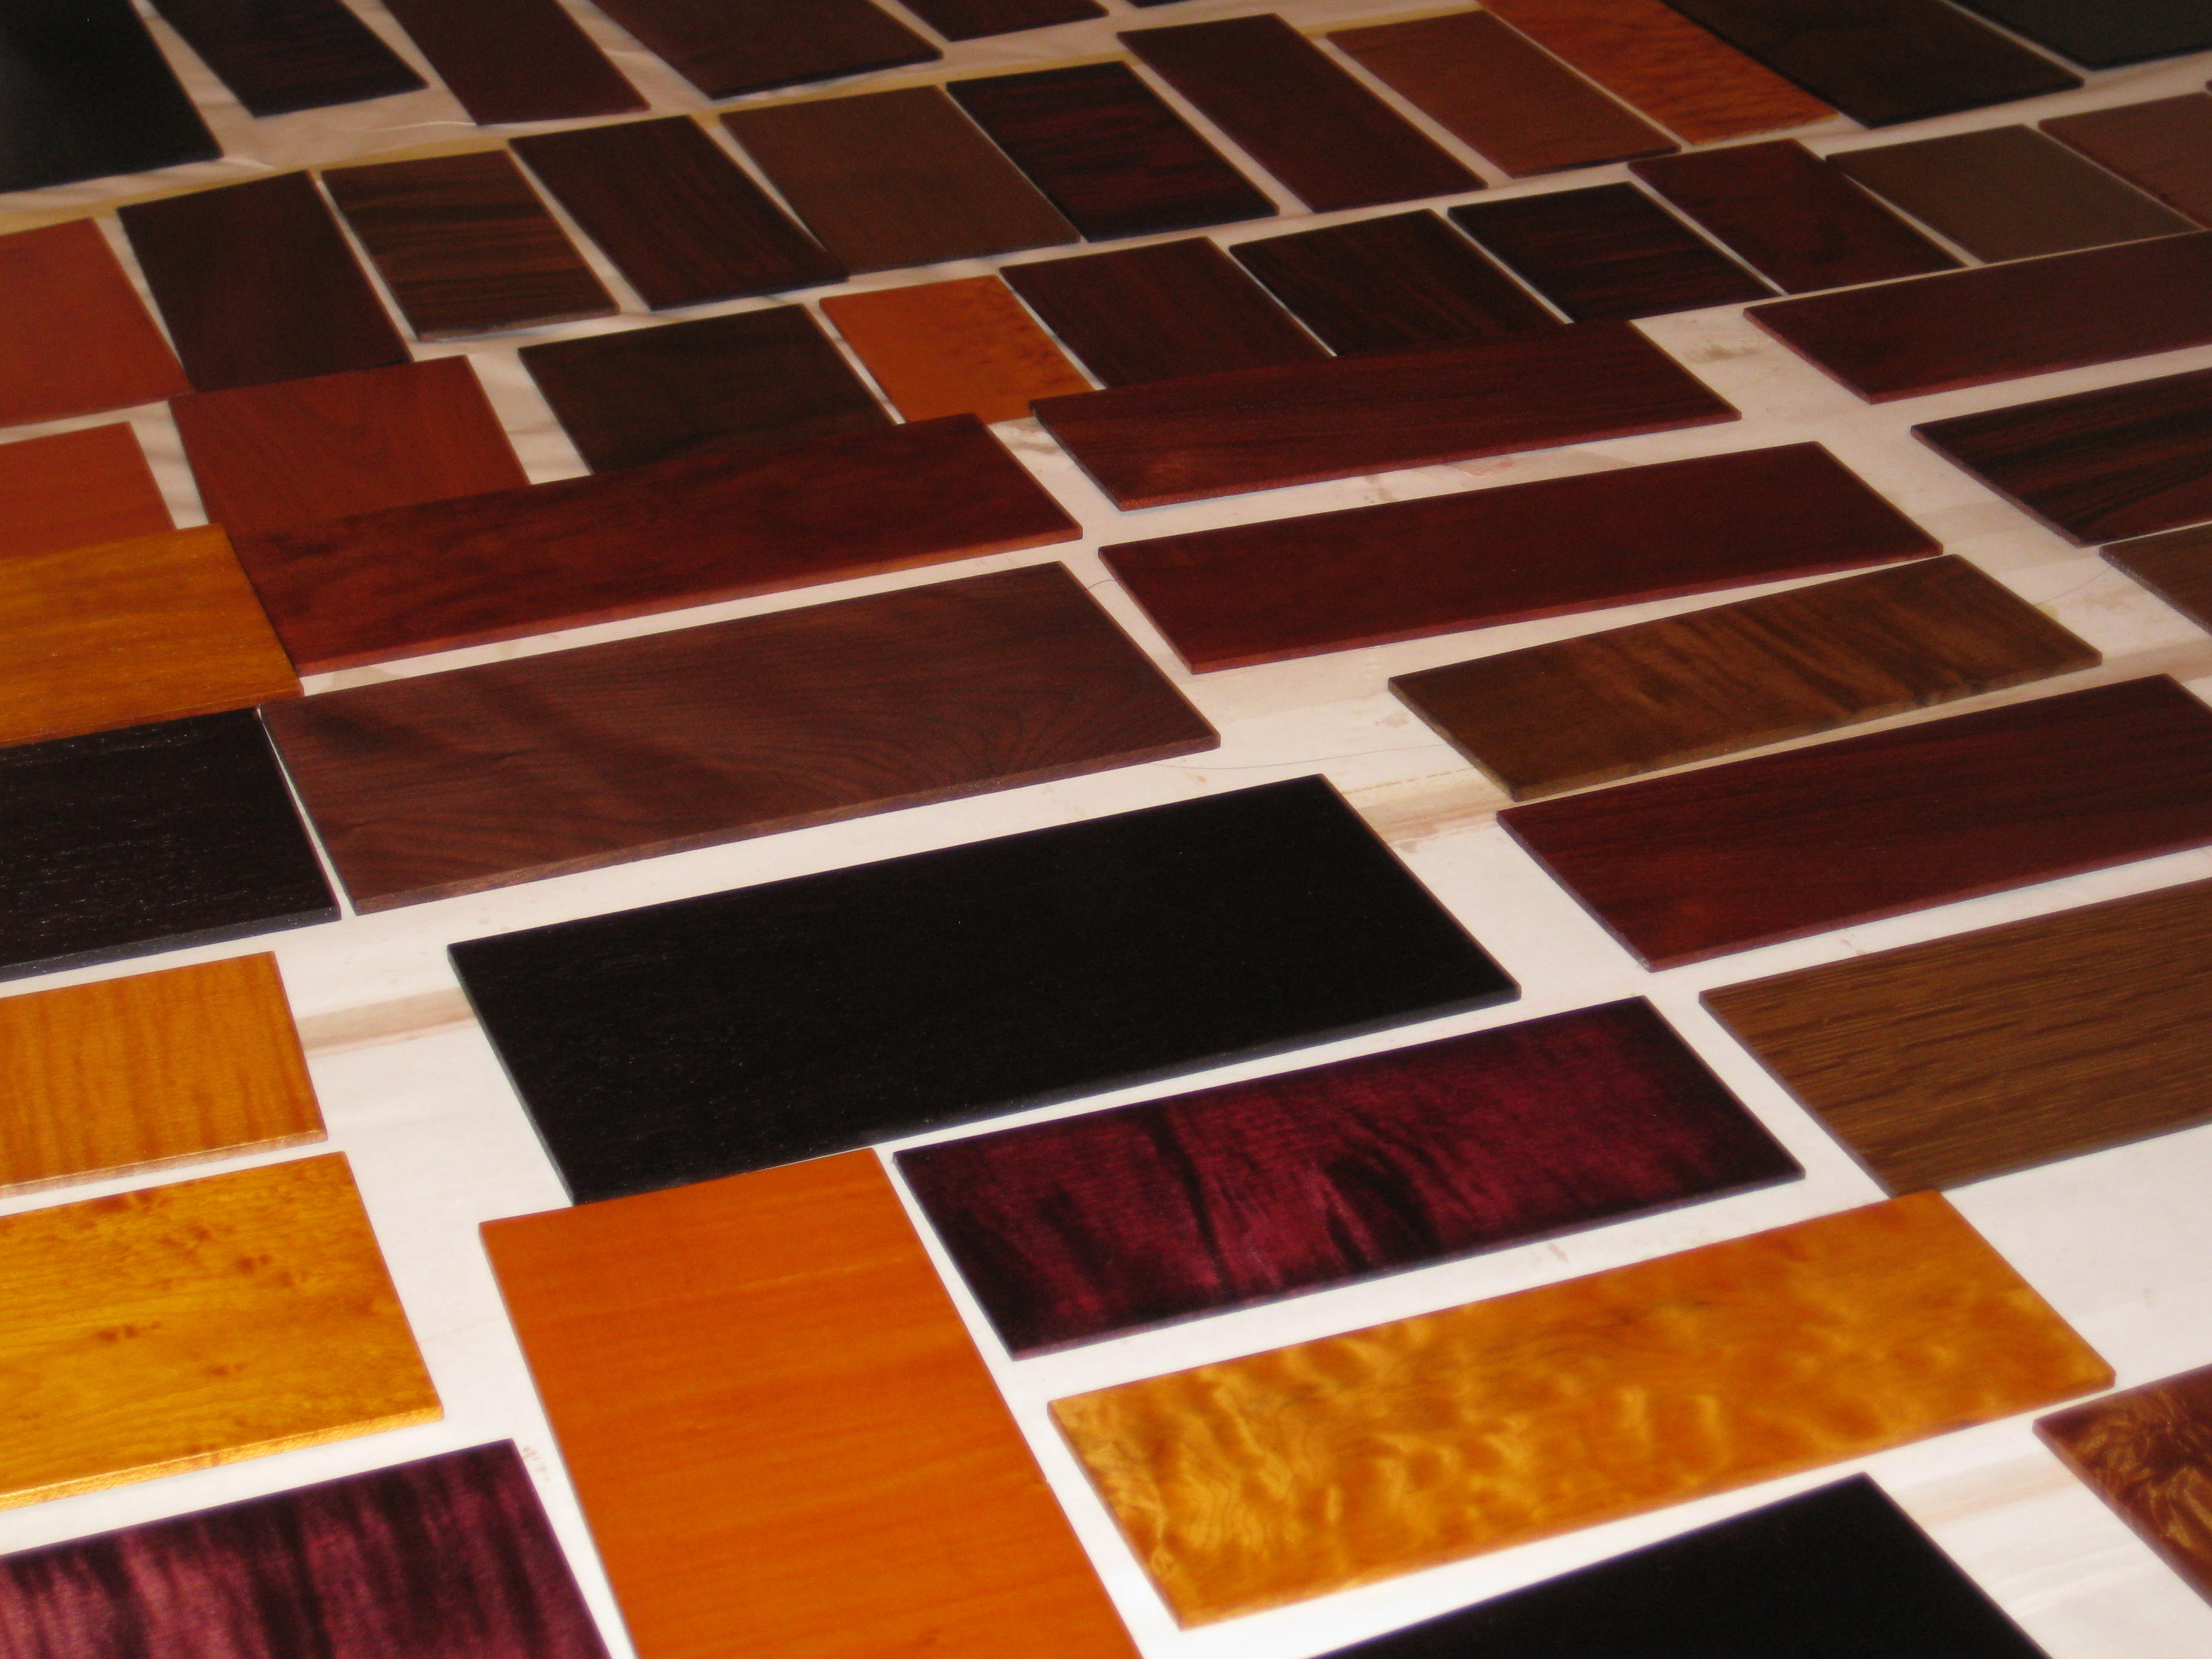
Finishing Sample Boards
If you would like to see pictures from previous Finishing Classes I have taught in my Workshop/Studio, here is the link to the Classes Photo Album:
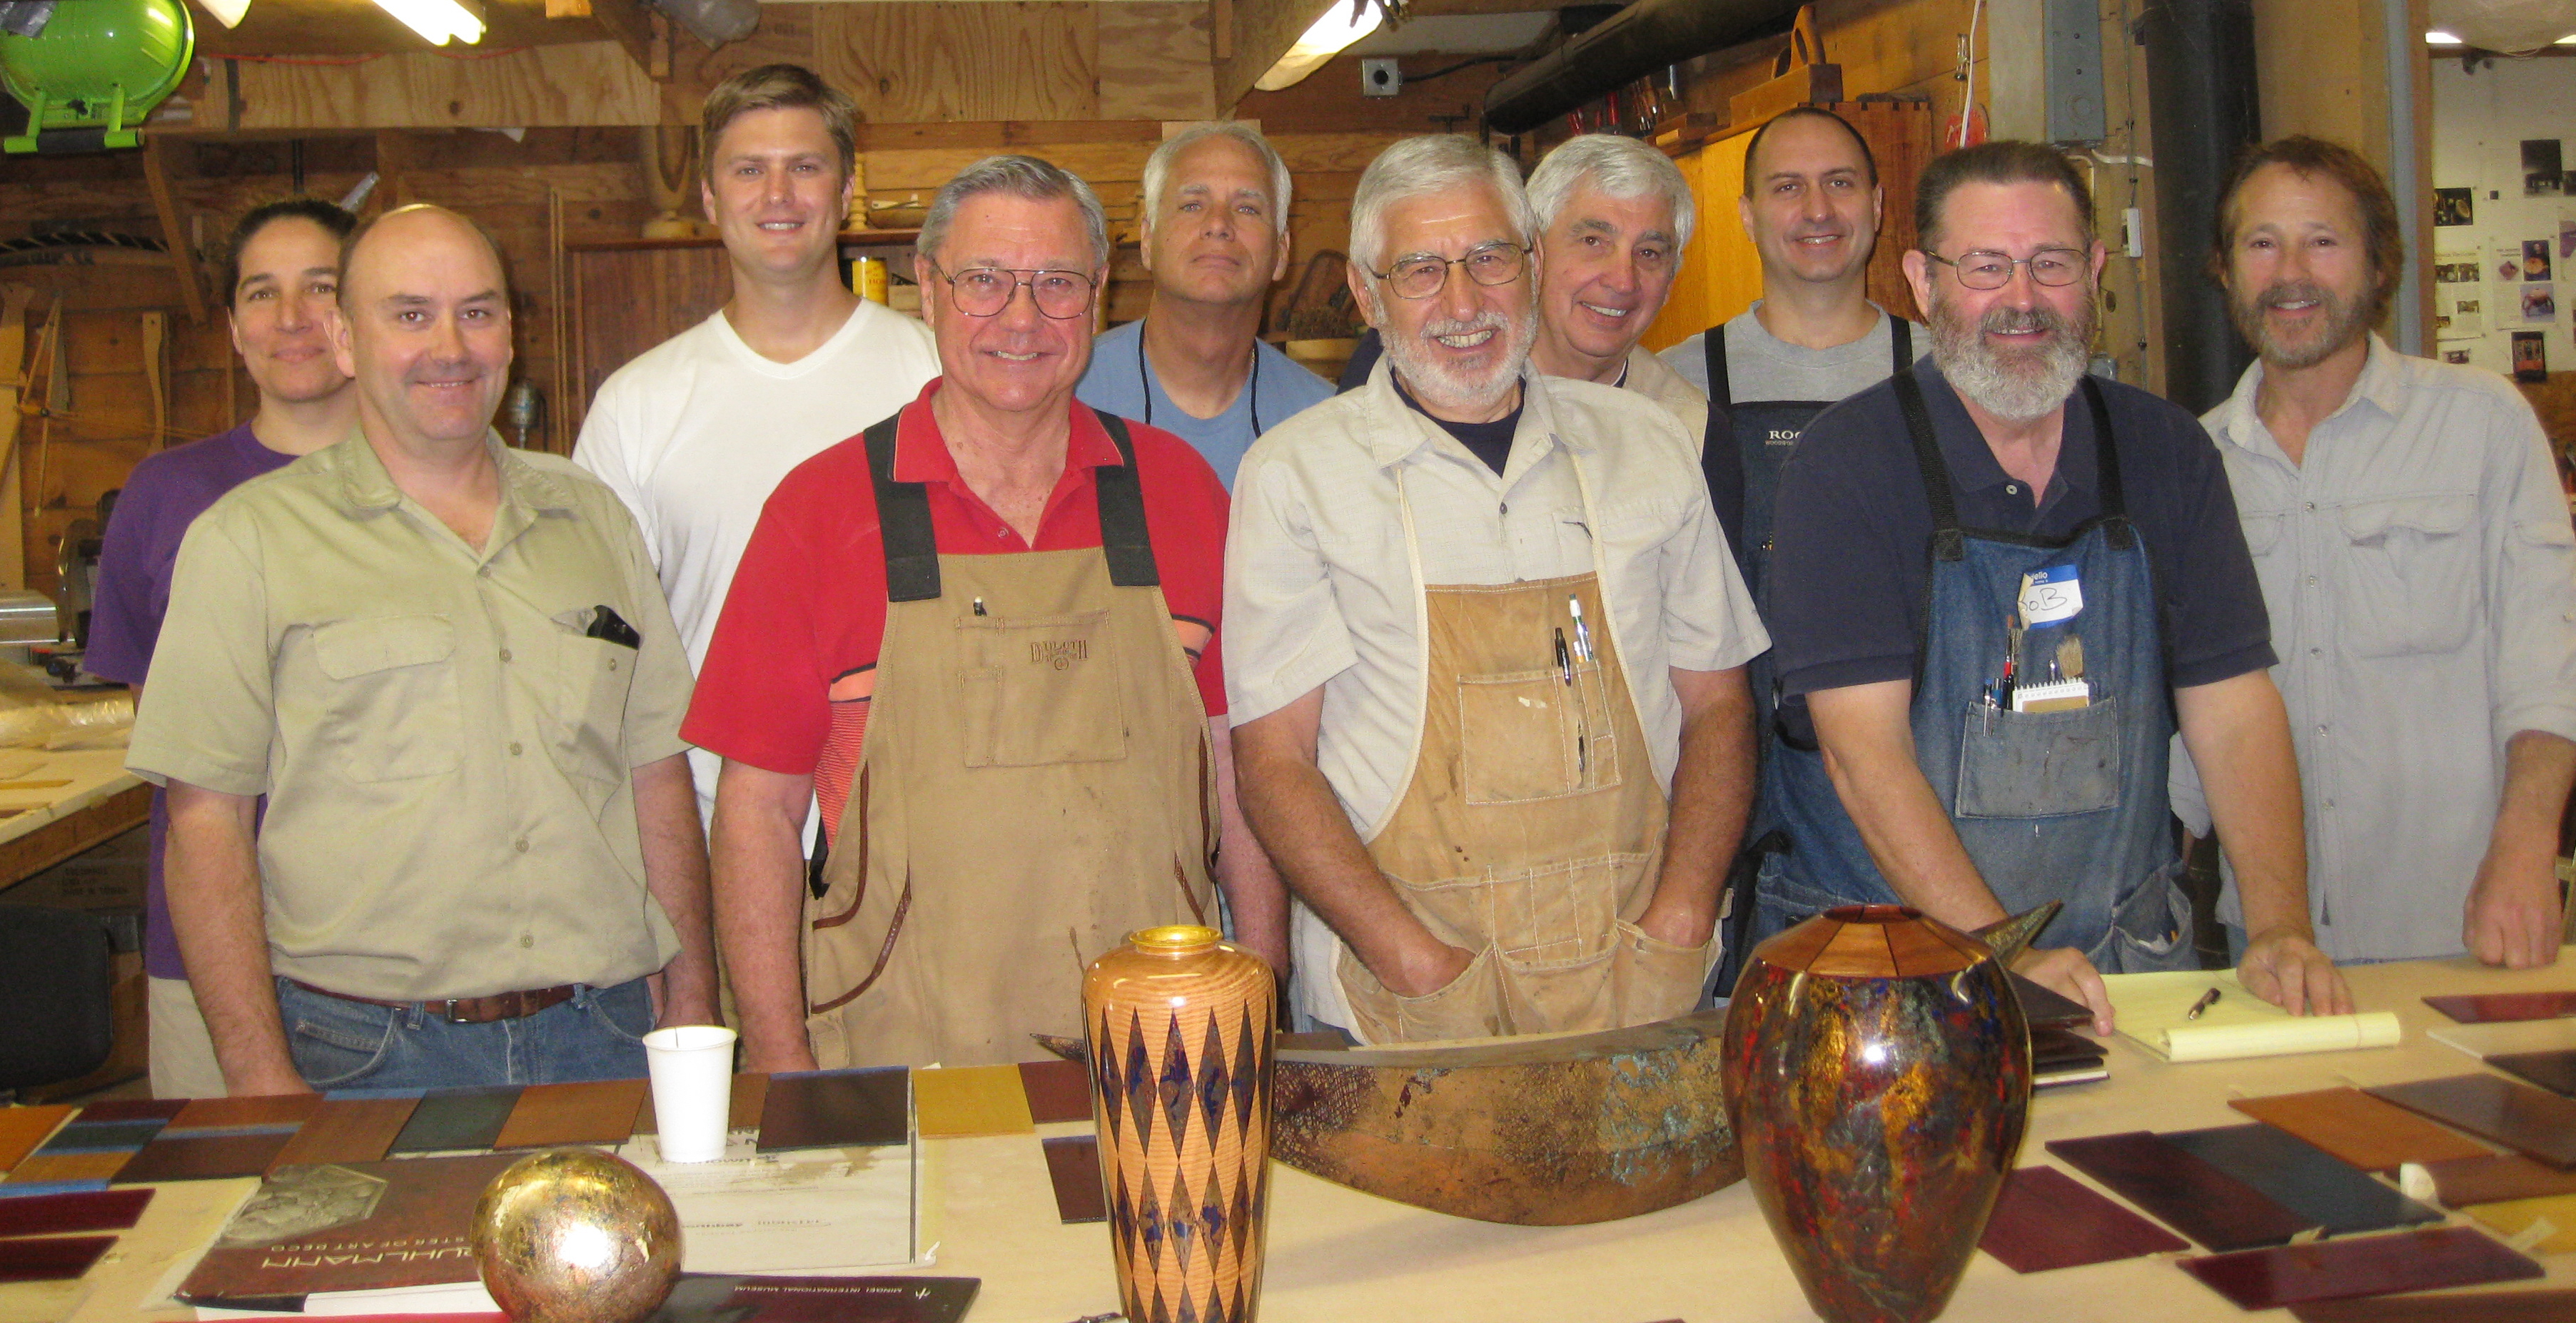
2012 Finishing Class
Question from a Client
David,
I bought this very old Chinese tray with half the lacquer worn off. I want to preserve what is left and use it to work on.
Can I paint or spray some kind of clear finish on it? You are our guru for surfaces on wood. All I know is textiles.
Thanks for your help.
Barbara
David’s Response:
Shellac is your best bet as shellac will stick to almost anything, and almost any finish will bond to shellac.
You can purchase shellac flakes and mix your own 2 lb cut with denatured alcohol but this shellac by Bulls Eye works really well and is very convenient to use. The most important part of application is temperature and humidity conditions. Make sure you work with a scrap piece of wood and do some test samples before applying it to your piece.
The ideal conditions would be a sunny day with temperatures around 75 to 80 degrees. If it is a rainy or overcast day, then do not spray shellac, wait for a dryer day. Shellac can absorb moisture from the air on a day with high humidity levels and the result will be a “milky”color to the finish. If you can spray it indoors in your studio, then make certain that the room/space has a thermometer in it and it reads 75 degrees or warmer for best results.
When I work on a piece that I am restoring, I lightly clean the surface first and try to remove any wax that has been applied over the years. I use to use Naphtha, but it has been removed from California’s hardware and paint stores for health reasons. Old Asian lacquers are Urushi lacquers which are natural resin from the Sumac trees. Shellac is a natural resin harvested from the Lac bugs in India and other Asian countries. Even if you are not able to light clean the surface with a mild solvent, I believe the shellac will still bond to it. Cleaning the surface first is still your best option.
Since Naphtha is no longer available, I would try some mineral spirits instead. Before using the mineral spirits, start by lightly brushing the surface with a soft, dry paint brush to see if the old finish flakes off or is still intact. Once you have lightly brushed the surface and removed any dust or loose material from it, then take an old t-shirt or clean cotton cloth and moisten it with some paint thinner (you can purchase the odorless type which is more user friendly) and gently rub the surface. Do not use any abrasive material like steel wool or scotchbrite, it can remove some of the finish.
Let the surface dry. It might look dull as a result, but it should be cleaner.
Shellac flows best when it is warm. When I spray it from a solution I have mixed or from a can, I always try to warm it first.
Cans are much easier to deal with. On a sunny day, simply leave the can in the sun until the can feels warm to your hands.
I have an oil filled radiator in my finishing room and I place the can on it until it feels really warm or you can just place the can next to a light bulb as a heat source.
Shake the can really well, and use long, light, uniformly even strokes across the surface, overlapping each stroke. The goal is to apply a light, wet, uniformly thin coat over the entire surface. The surface should look glossy without any dry spots but do not apply too much at a time to the point where it puddles or runs.
The great thing about shellac is that in addition to protecting the surface, it also acts like a coat of glue bonding everything together.
You might want to apply several coats depending upon how it looks. Apply a second coat of shellac before doing any sanding so as not to damage the original finish. After the second coat has dried, then lightly sand it with some 600 grit sand paper to smooth and blend the old and new surfaces. Try not to cut through the shellac into the original finish, but if you do, just apply another coat of shellac. After the last coat of shellac has dried overnight, you could lightly rub it with 0000 steel wool to further smooth and blend everything. I like to follow up with a light coat of Renaissance wax to bring up the soft sheen after it has been dulled by the steel wool.
Please remember to practice on test pieces first before working on your prized possession.
Olive wood from California orchards is prone towards developing cracks and checks very easily. It is a beautiful wood and it is stable once it has dried.
Here is what has worked for me in dealing with olive wood for turning. I recommend that you have some Green Wood Sealer on hand.
I brush green wood sealer over the entire piece of olive wood, which means the ends (number 1 priority and it is best to double coat them) as well as the faces and sides. Keep the olive wood in a cool dark place for long term storage, away from the sun and the wind.
I like to twice turn bowl, vessel blanks or any object that I turn from green wood. Here is the procedure I follow:
1) The first rough turning is to shape the object and get it down to a wall thickness somewhere between 1 inch to 1 and a half inches thick. As soon as I have completed the rough turning, I completely submerge the bowl or object in denatured alcohol. I have found that using a heavy duty contractors 3 mil garbage bag works well for conserving the amount of alcohol needed. Place the object in the bag and fill it with denatured alcohol (available at all hardware and paint supply stores for thinning shellac etc.) until the object is completely submerged, then close and secure the bag with a rubber band or spring clamp. Allow it to set for 24 hours. The alcohol will displace the bound water inside the cell walls of the wood. Take it out and place it upside down on a rack and let it drip dry for another day with a paper bag over it to block air movement. Look for the start of any checks and if you see any then apply CA glue (cyanoacrylate) over them right away. The CA glue will adhere to wet wood and stop the checks from progressing.
2) To further prevent checks, I paint the object completely with green wood sealer again.
This will slow down the drying process. Usually the alcohol treatment will dry the rough turned object within 2 weeks which is great, and then you can remount the piece and do the final turning and sanding and finishing. Since olive wood likes to check and crack easily, I have found it is worth the extra effort to paint it with green wood sealer (after the alcohol treatment) so that it slows the drying process and helps to minimize any cracks. This can slow the alcohol drying process down to 1 or two months but it is worth it to prevent those darn cracks.
3) Once the wood is dry (I use a moisture meter to check it and look for a 10 percent moisture content) then you can remount it on the lathe and do the final turning, sanding and finishing.
Another method to measure dryness is to weigh and date the rough turning and mark it on the wood. Keep weighing it and once it stops losing weight it should be dry.
If cracks have occurred, then I sand some of the olive wood with 220 grit sandpaper, take the dust and mix it with slow setting epoxy, and use it to fill the cracks. I also like to use black dye (mixol) and mix it with slow setting epoxy to fill any bark inclusions, knots or other areas where it seems appropriate.
Fine work requires extra effort. Put in the work and your pieces will reflect that effort.
I wish you all the best in your wood turning,
Last weekend I demonstrated at the Desert Woodturning Roundup in Mesa, Arizona. I had 6 rotations, 2 on combining metal with wood, 2 on gilding turned vessels and 2 on creating patinas on vessels.

David Marks doing demonstrations at DWR

David Marks demonstrates gilding Japanese maple leaves with 22 Karat Gold against a silver leaf background

“Desert Urn” is the title of this 81/2″ tall x 51/2″ diameter hollow vessel I turned. It combines silver inlay into the pernambuco and ebony rim at the top. I gilded the lower body of the vessel with silver leaf and did a patina finish over it.
There was a great line up of Demonstrators :
J. Paul Fennel who lives in Scottsdale and does some amazing pierced and carved hollow vessels.

J. Paul Fennell’s wood turned and carved vessels
Richard Raffan from Australia who is one of the best known turners in the world with several books and videos that have won critical acclaim.

Richard Raffan on stage turning a bowl for the Desert Woodturning Roundup
Molly Winton who has earned her fine reputation for her surface embellishments of wood burning, carving, texturing, and coloring.
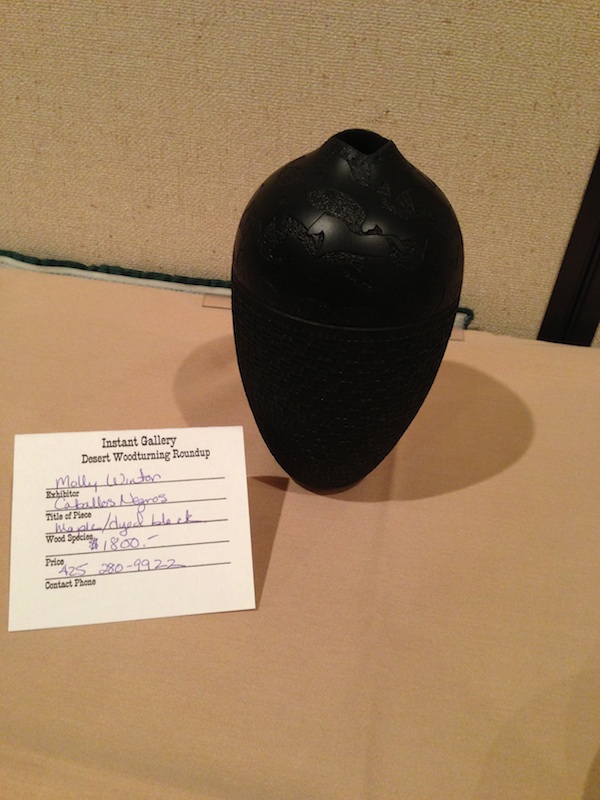
Molly Winton’s beautiful turned carved and dyed hollow vessel
Malcolm Tibbetts famous for his incredible segmented turnings that boggle the imagination and his book and numerous DVDs on the subject.
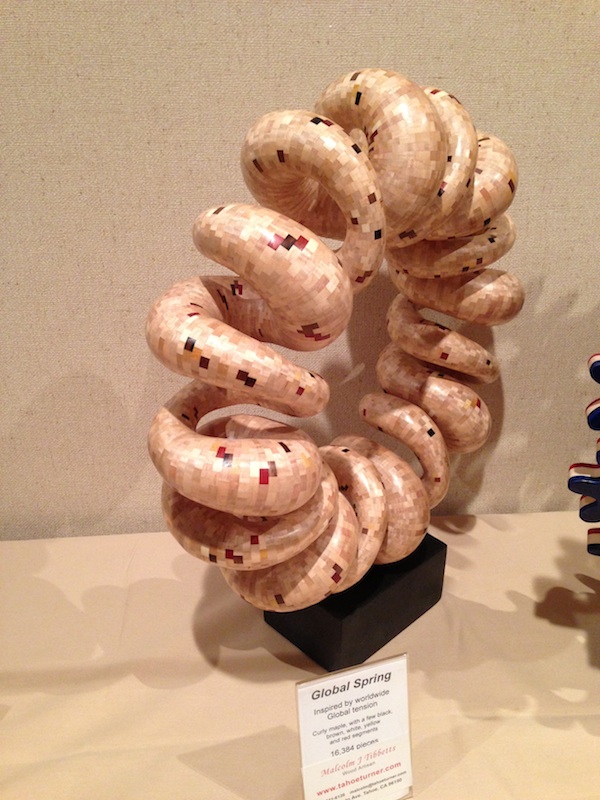
Malcolm Tibbetts’ amazing segmented turned sculpture
Michael Hosaluk who is a member of Canada’s Royal Canadian Academy of Arts and is well known world wide for his incredible creativity not to mention turned and burned baseballs.
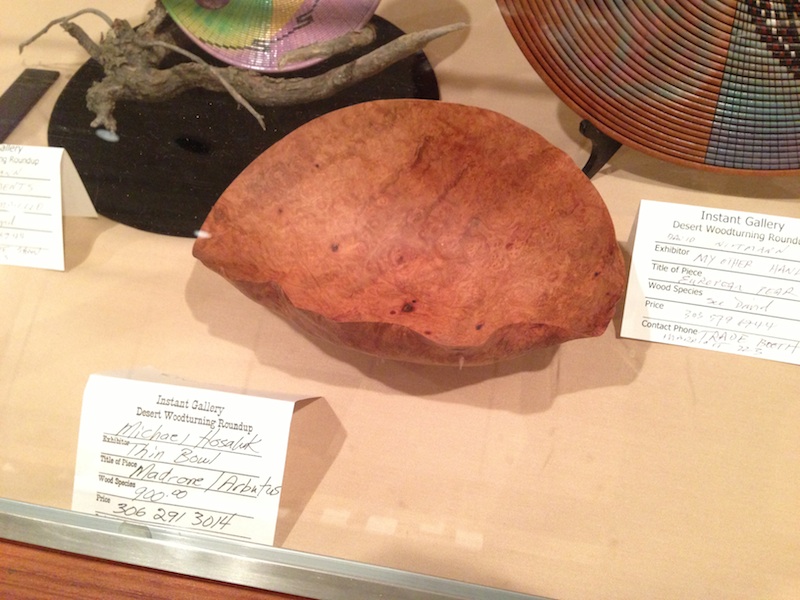
Thin turned madrone burl bowl by Michael Hosaluk
Matt Monaco, a production turner (and fellow drummer) who lives in Arizona whose work is influenced by Mexican, Southwestern, and African cultures.

Nested bowls by Matt Monaco
John Lucas from Tennessee, who is well known for his turned hand mirrors, sculptural turnings, articles on wood turning, and photography.

Turned hand mirror and other pieces by John Lucas
Here are some photos of the work I demonstrated.
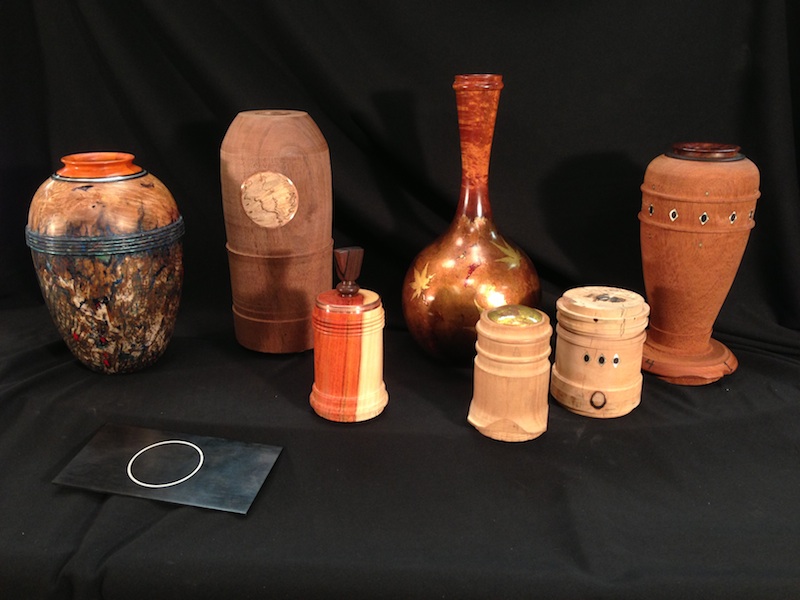
Wood and metal turnings, some are demo pieces which are not completed
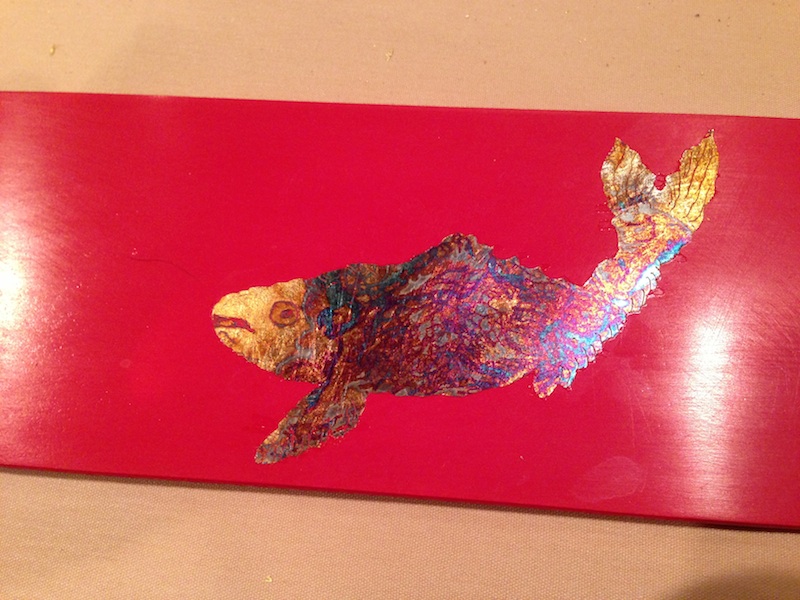
Demo sample of gilded fish. Silver leaf with chemical patina.
The instant Gallery had numerous works of art with a wide range of talent.

These are some very fine miniature turnings by Hans Finsterwalden

Dale Gillaspy’s very creative wood turning titled “Pouring Wine”
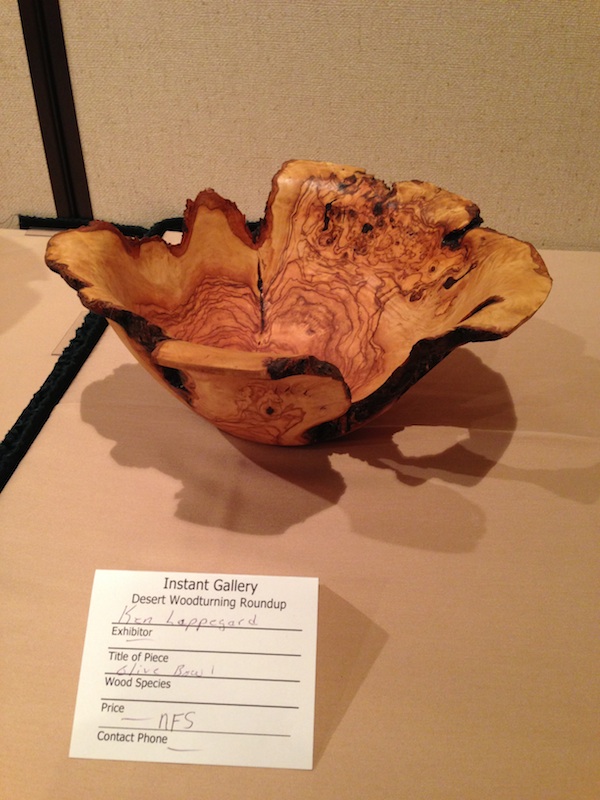
Beautiful Olive wood bowl turned by Ken Lappegard in the Instant Gallery at DWR
Malcolm Tibbetts and I were asked to be available to give critiques to those who wanted them in the Instant Gallery.
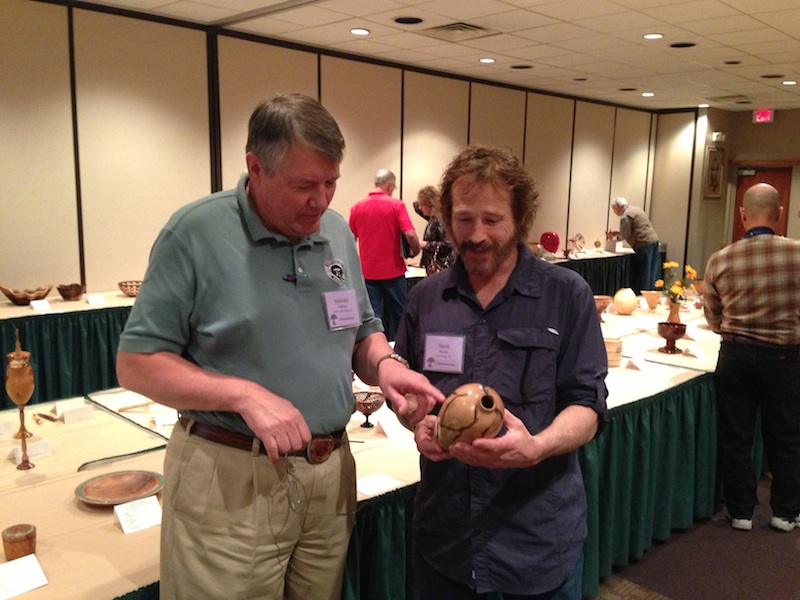
Malcolm Tibbetts and David Marks giving helpful critique to Dale Gillaspy in the Instant Gallery at DWR
I want to personally thank Dale Gillaspy and the entire crew of volunteers from the Arizona Woodturners Association who worked really hard and did an excellent job of organizing this event.
I will be teaching a 3 days hands on group class on Gilding & Chemical Patination at my school here in Santa Rosa, CA on August 16 – 18, 2013. For the class description and registration, go to the Classes Section of my website: Classes
If you cannot make it to my Gilding & Chemical Patination Class, I do have a DVD that I sell from my estore at my website that gives step by step instructions on the process: Gilding & Chemical Patinations DVD
I had a student in mid November 2012 that traveled from North Carolina to take a 5 day private class with me. One of the things she was interested in learning was my method of cutting dovetails using the bandsaw and getting that “hand cut” look.
She had been taught by a Master Craftsman from the UK to use a dovetail saw. She loves hand tools and is very good with them, especially hand planes. The challenge for her was that due to some recent medical issues, she was experiencing difficulties holding the dovetail saw straight all the way through the cut.
I her told that I have had carpel tunnel surgery and two other hand surgeries related to tendon pain and I prefer to use the bandsaw to cut dovetails.
I use a method of cutting the pins first, if you are cutting by hand with a dovetail saw, then it makes sense to cut the tails first.
She was quite pleasently surprised when I demonstrated that by tilting the table of the bandsaw 8 degrees in one direction, and set the fence to the appropriate spacing, that we could cut the pins with very straight lines. Once those cuts were made, we tilted the bandsaw table to 8 degrees in the opposite direction and made the other set of cuts on the pins, again moving the fence to each layout line.
After that we used the fretsaw to cut out the bulk of the waste, clamped a guide block across the scribe line, chiseled half way down, flipped the stock and then did the same procedure on the opposite side.
I like to clamp the guide block onto the tails board to ensure accuracy in relationship to the scribe line. Next I clamp the pins board to the guide block lined up with the edges of the tails board and scribe the outline of the pins onto the tails board.
This gives us the cut line. After the tails are cut and pared with some dovetail chisels,then we do a test fit, pare a little more until we are ready for the glue up.
Here is a photo of her completed dovetail sample cut in cherry wood.
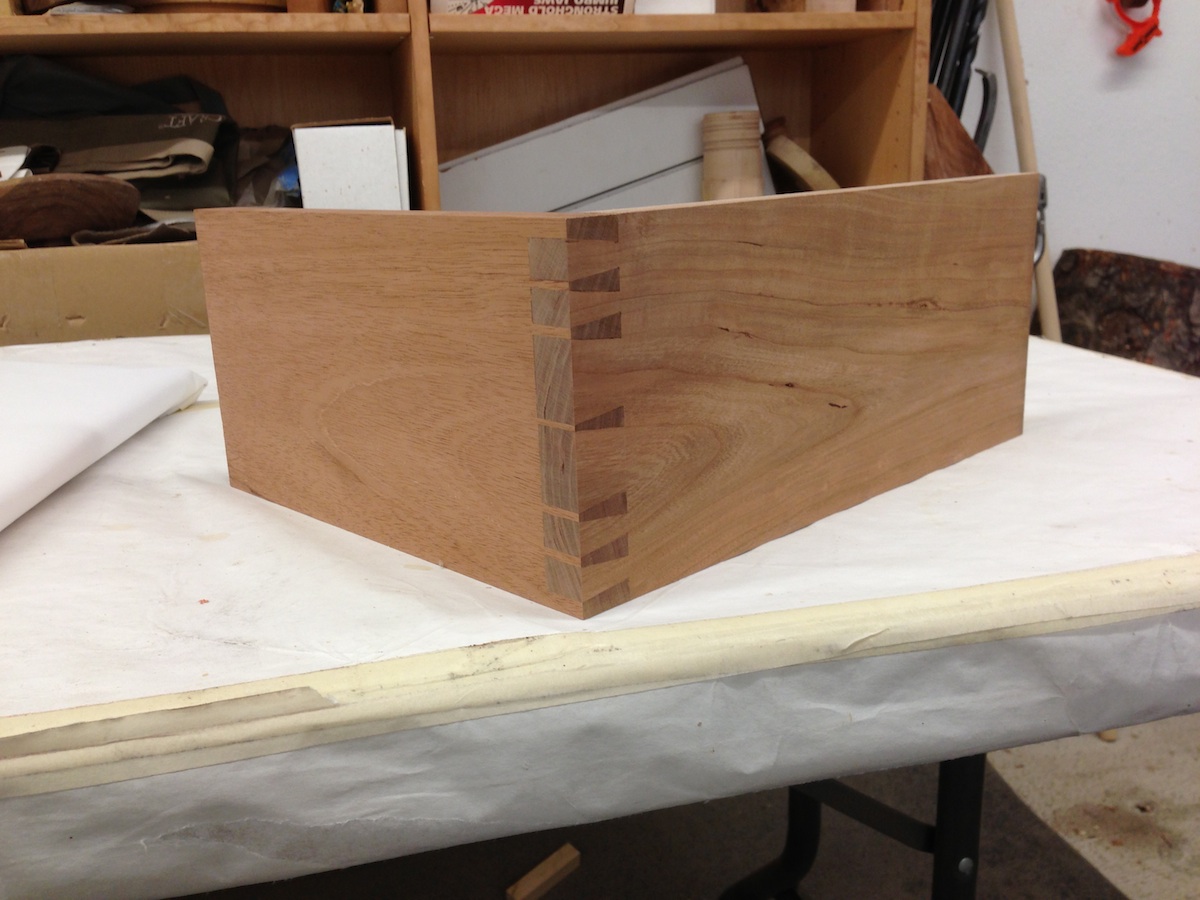
This is the completed project of bandsawn dovetails cut in cherry wood

Woodworking is about passion and guitar making is a form of that passion. Woodworking is challenging enough but building a guitar requires making something out of wood that not only looks good but also sounds good.
Kevin Russell is a musician and show promoter who lives in Seabastopol Calif. Kevin is so passionate about guitars that he decided to stage the first Sebastopol Guitar Festival.
Two of my fellow band members from “The Bench Doggs” are none other than Tom Ribbecke who is an incredible arch top guitar maker and Larry Robinson, one of the finest inlay artisits in the country, so I had to go out there and check out the festival to see what my friends were up to.
Larry Robinson talks about his work at the Sebastopol Guitar Festival
Larry had some of his instruments on display and I am always inspired everytime I see his work. Take a look at the amazing detail work that Larry put into his “Nouveau Guitar”.

Nouveau Guitar is magnificent beyond description

This is a close up view of “Nouveau Guitar”
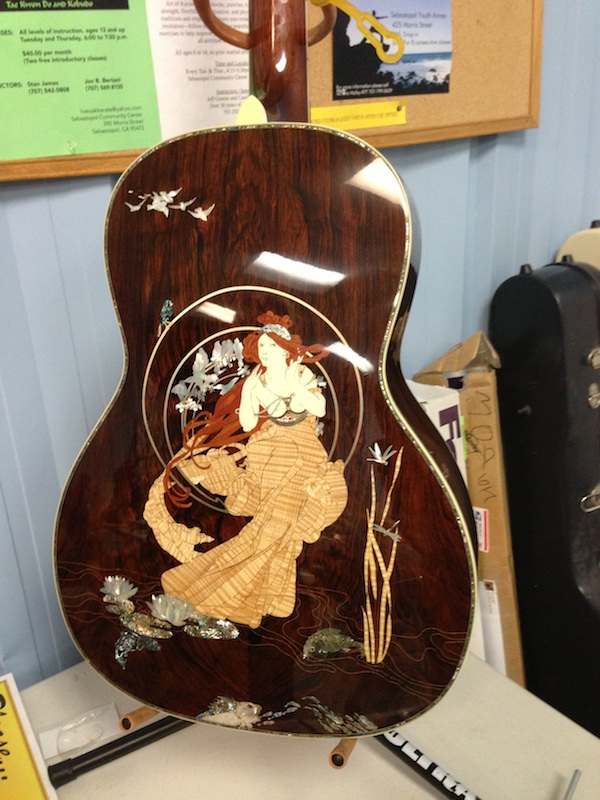
This is the incredibly beautiful back of the “Nouveau Guitar”
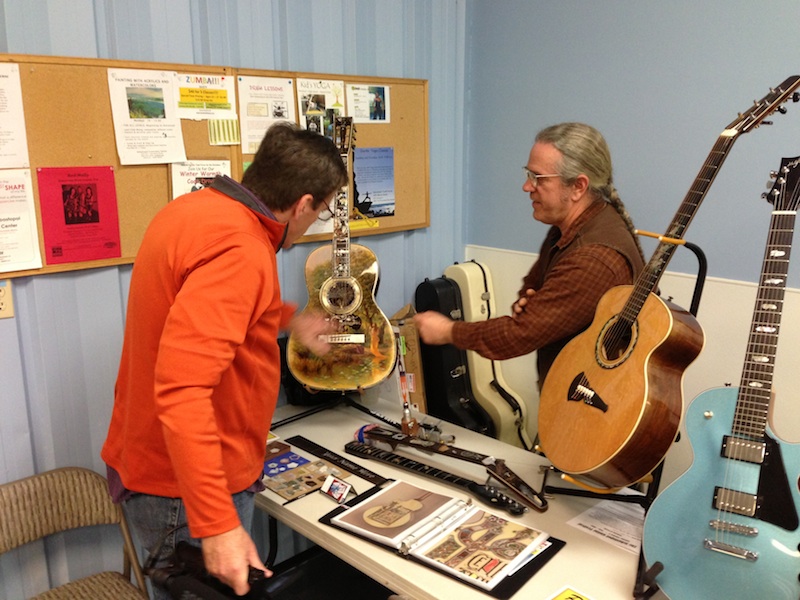
Tom Ribbbecke, Master Luthier, and his shop foreman Stuart Day were on hand to answer questions about the amazing qualities of the arch top guitars they build. Tom has been designing and building guitars for over forty years. His craftsmanship and innate skills result in guitars best described as “extraordinary” and exceeding all expectations.

Master Luthier Tom Ribbecke and his shop foreman Stuart Day
My friends Richard Prenkert and John Knutson also had their guitars on display as well as many other great guitar makers.

Richard Prenkert with two of his guitars

John Knutson plays one of his guitars at the festival
The Festival had a down home, relaxed feel to it. Guitar makers shared their creations with fellow makers, friends and guitar enthusiasts as well as others that were new to this genre and curious to see what is was all about.
I was fortunate to be able to capture some of the sounds of the festival when I walked into one of the display rooms. John Knutson, and Bill Iberti were taking a break from exhibiting their work and found themselves playing some music with another musician. The wonderful melodies captured the attention of all that were within earshot.
Tom was asked to lead a panel discussion about what it takes to earn a living as a guitar maker. Some of the people that work with Tom were on hand to talk about their work as well as Robert Lee, another guitar maker who owns his own company.

Stuart Day, Maegen Wells, Tom Ribbecke, Timmy Lovold, Frankie DiSouza, Mike Gutsch and Robert Lee, participate in panel discussion about their passion for guitar making
Master Guitarist Mike Dowling performed on stage and was captured in this brief video by Master Luthier Bruce Sexauer:
Mike Dowling Video
A great time was had by all. Tom, Maegen, Stuart, myself and Larry were captured in this photo at the end of the Festival.
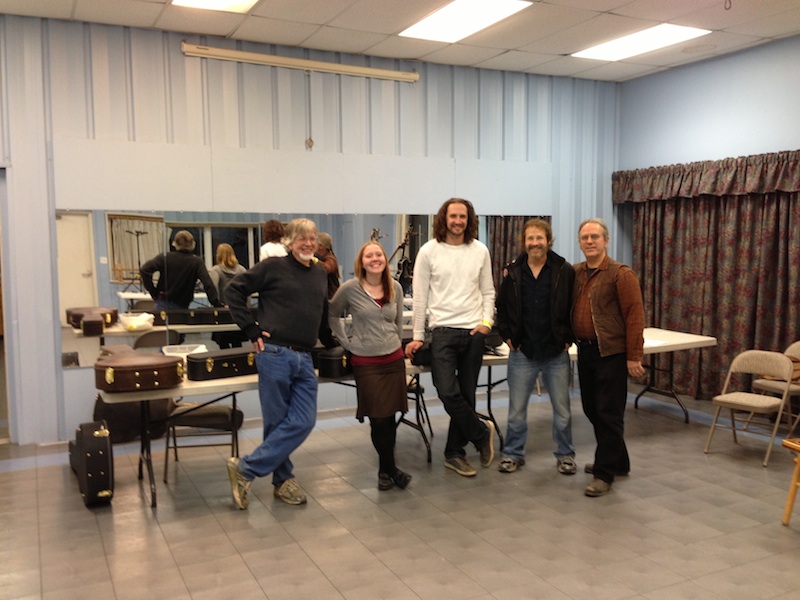
Tom Ribbecke, Maegen Wells, Stuart Day, David Marks, and Larry Robinson at the close of the 2013 Sebastopol Guitar Festival
Larry will be teaching a class at my woodworking school here in Santa Rosa, CA on Shell Inlay on March 23 & 24, 2013. For a full class description and registration in, go the Classes Section of my website: Classes Page
Here is the link to the Bench Doggs website where you can see me, Larry, Tom, and Chet playing rock & roll: The Bench Doggs
To see Tom Ribbecke’s guitars : Ribbecke Guitars
To see more of Larry Robinson’s inlay work: Robinson Custom Inlays
Phil Crane from the Sacramento area took a class with me early November 2012 on how to make a bentwood laminated lamp from mahogany similar to the one I made on Woodworks episode #512.
Bending wood opens up a world of design possibilities that enable one to create things that have flowing curved lines as opposed to the predictable flat planed designs that woodworking is usually associated with. The process ironically begins with jointing the wood to create a flat surface.

The first step is to create a flat surface.
The next step is to resaw the wood into thin strips, the mahogany needed to 1/16″ thick in order to bend to a tight radius.

Phil is resawing mahogany into 1/16″ strips on my 36 inch bandsaw
Laying out the strips on a table covered with plastic makes for a faster method of rolling on the glue. I prefer a slow setting Urea resin glue. The brand I am using is Unibond 800.

Laminates are coated with urea resin glue.
Here is Phil quite happy that we are ready to put the laminates in the bending form that I made on Woodworks.
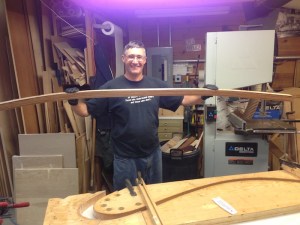
Phil Crane holding stack of glue coated laminates ready to go into the bending form.0
After the glue has dried overnight at 70 degrees, we unclamped it and the wood retains the shape of the form.
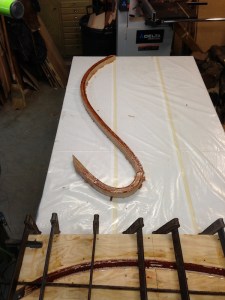
The wood has now taken on the shape of the bending form.
Our next challenge was to resaw the bentwood lamination in half which I did on my 36 inch bandsaw because of the wide curve.
After that we routed a channel and glued in some 3/8th inch copper tubing for the wire.

We used hot melt glue to hold the copper tubing in the channel.
Once everything was glued up, we joined the legs to the trunk and Phil could begin sculpting and shaping the legs.

Phil is using a pattern maker’s rasp to smooth and blend the shape of the legs.
After much work with a pattern makers rasp and lots of sanding, Phil’s lamp is ready for the finish which he will apply at home in his own shop.
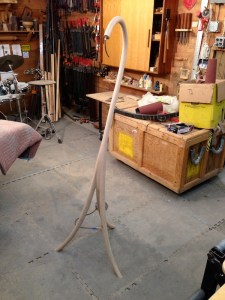
Phil’s completed lamp, ready for the finish.
This is a photo of the original lamp that I designed and built for Woodworks made from Koa.

This is the original Koa bentwood laminated lamp that I designed and built for WoodWorks episode 512.
The lamp shade was a challenge for me. I finally decided to purchase one made from white Alabaster which seemed perfect for my design.

Alabaster lamp shade
David bandsaws a mahogany bentwood lamination in half for a student that is taking a class to build a replica of David’s Koa Lamp design from Woodworks episode #512
